
LED Blink Clock
Step 1 - Build the Project
The Arduino software has a built-in timer called millis() that starts counting from 0 as soon as a program starts. In this code, you can use the millis() function to count up time, one millisecond at a time, and build a clock to display the hours and minutes.
Step 2 - Upload the Code
Step 3 - Read the Walkthrough
The first step in creating the clock is to set the time using variables. You create the byte variables hour, minute, and second and give them the current time. This is the starting place for your clock’s count. Next, create an unsigned long variable called timer. You will subtract this variable from the millis() count to determine how much time has passed.
A function will make it very easy to grab the time value at any point in the sketch. This function is a void type, meaning it just does a process or task when it is called. This function simply updates the second, minute, and hour variables and ‘rolls over’ seconds into minutes and minutes into hours.
The next function you create reduces repetitive code by taking in the LED pin number you want to illuminate and the variable that LED represents and running the digitalWrite() function with those two numbers. When you create the function, you need to tell it what type of variables it should expect and name those variables. These variables exist only within the function, so if you pass the function another variable from the loop, it will get renamed in the function.
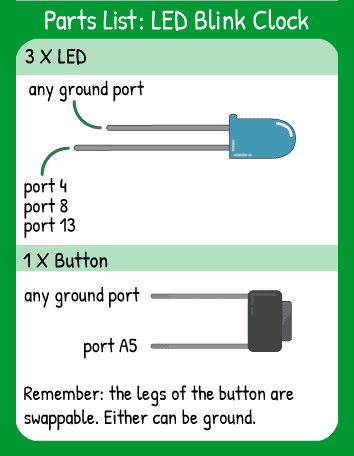
Your next step is setting up the hardware. You have only input for the three outputs, but the outputs are all tied together and will all execute at one time in the loop.
The loop section of this code is focused on checking the status of the button and updating the functions. The first thing it does every loop is run the getTime() function so that the time is very up-to-date.
Until the ‘if’ statement becomes true (i.e. the button is pressed), the loop will continue to update the time variables. When the button is pressed, the loop calls the function blinkTime() with the LED pin and the variable to blink on that pin. Then, the function runs ‘variable’ number of times and jumps back to the loop, delays 400 milliseconds, and then calls the function again with the next LED pin and variable to blink on that pin. The third call to blinkTime uses a ‘modulo’ (%), which essentially says “Take the value of minutes, divide it by ten, and give me the remainder of that equation”. So if the time is 8:52, the minute %10 is (52/10= 5 with a remainder of 2). The two is what is passed to the blinkTime() function to be blinked.
Once everything has blinked through, the loop starts again by updating the time and checking the status of the button over and over until it’s pressed again.
