
LED Strip Color Sweep with Button
Step 1 - Build the Project
Holding down a button bounces a pixel up and down the flexible LED strip with an if statement.
Step 2 - Upload the Code
Step 3 - Read the Walkthrough
The LED Strip library is a separate file of code. It contains functions and methods that are specific to controlling a strip of LEDs. To use the library, you use the #include statement. Then, you have to give the library some information, similar to setting pinMode() for components.
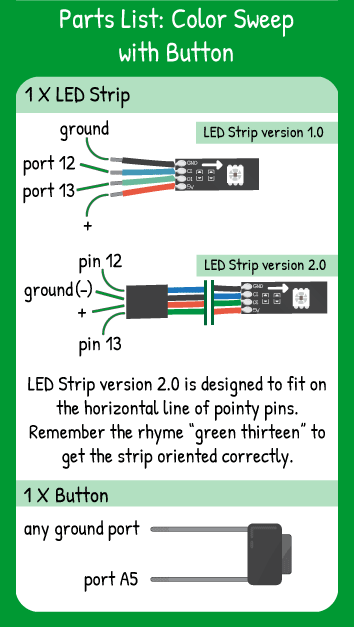
To tell the library the name & attributes of your LED Strip, you create an object. In this case, the object is called ‘strip’ and it has 15 pixels, the data pin is number 13, and the clock pin is number 12 on your carrier board.
Next, create an integer called numPixels. Its value should be equal to the number of LEDs on your strip.
Next, you’ll set up three variables that will have updating values throughout the loop.
Color refers to a value -1 to 300.
Pixel is the ‘index’ of the pixel the code is modifying. Keep in mind the first pixel is pixel 0.
Direction refers to whether the code is modifying a higher pixel address next or a lower pixel address next. If Direction is 1, then the code is moving up the strip toward the tip. If Direction is -1, the code is moving toward the base of the strip.
In the setup, set the pin mode of your button to be an INPUT_PULLUP. When the button is pressed, the button sends a LOW signal to the pin it’s connected to.
The first step in the loop is to use the .setPixel method() to set a color value for the first pixel. Then you display that color on the pixel with strip.draw().
The delay controls how often the button is checked. A large delay in the code will mean the button is checked less often.
The first if statement is checking if the button on A5 is LOW, meaning it’s pressed. If it is pressed, the pixel is updated by ‘Direction’, so it moves either up or down the strip depending on whether Direction is positive or negative.
There is not a closing brace on the first if statement yet, so it is not over. The second if statement (about Direction) is nested inside the first. That means the second statement isn’t even checked unless the first statement is true. If the pixel equals either 0 or numPixels, Direction is reversed by multiplying it by -1. The closing brace closes this second if statement, but not the first.
Next, color is incremented by 1. This will occur regardless of the pixel’s position.
Finally, there is a third if statement about color value. It is also nested inside the first if statement. Just like the Direction if statement, this isn’t checked unless the button is pressed. If it is true that the color variable is 300 or more, the color is reset to 0.
The three closing braces that you see in a row all match up vertically to an opening curly brace. The first one closes the color if statement. The second one closes the button if statement. The third closes the loop.
Indentation is important in programs like these. It clarifies and simplifies your syntax.
