
Tune LED Colors with Button
Step 1 - Build the Project
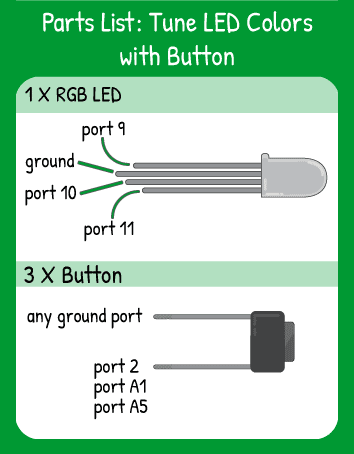
Topics Covered:
For this project, you’ll use three inputs to affect three outputs. Each button will change the brightness of an LED. Since each input does the same thing for its respective output, we will use a function to save some repetition in the code.
Step 2 - Upload the Code
Step 3 - Read the Walkthrough
First, you need a variable to hold the brightness value of your outputs, since that will be changing as the button is held down to ‘tune in’ a specific color. A byte variable type should work since the highest analogWrite value is 255 and the highest value a byte can have is 255.
Next, you define the function. A function is a cluster of code that always runs together. It can do a set of tasks, run a calculation and spit out the answer, check the status of an input, or do almost anything else code can do in an Arduino loop. Your function here just does a set task with no output, so it is a ‘void’ function.
Like a variable, you should name it something that is easy to remember and understand. Within the parentheses of the function, you define what types of things can be fed into the function and what they are called. For this code, we will pass the function a byte (the pin number) to work with. That byte will be called “_pin” within the function.
Once the function is called (passed a byte), it will increase the brightness variable by one, then analogWrite() brightness to the pin number that was passed in. It then checks the ‘if’ to find out if the brightness variable should be reset. After that, the function is out of the way and waits until it is called again to do anything.
After setting up each pin as an INPUT_PULLUP (buttons) or OUTPUT (LEDs), the main job of the loop is to check the button status and call the function. Depending on which button is pressed, the loop will send a pin value up to the function, where the function will update brightness for that pin.
Rather than having a variable for each LED’s brightness and running the ‘increment variable, write variable, check variable, reset variable” routine with each ‘if’ statement, you now only need to give the function a value and the rest is taken care of!
