
Blink Multi-Color LED
Step 1 - Build the Project
Use the digitalWrite() command to control each individual color of a multicolor LED, then combine the colors!
Step 2 - Upload the Code
Step 3 - Read the Walkthrough
The first thing you'll do in your code is create two integer variables. These will stand in for the value of your delays throughout the code. Each time you use the variable onTime, the code will replace that word with the value 1000. This makes it easy to change every delay with a single line of code.
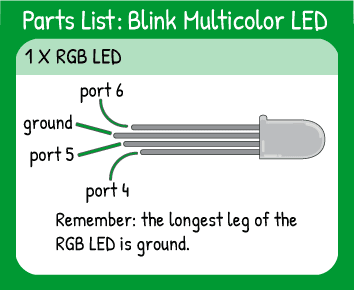
In the setup, you will set each of the multicolor LED pins to OUTPUTs so that they can receive voltage from the Maker Board.
The loop of the code is made up of six very similar code blocks. The first code block turns on pin 4 with the digitalWrite command. Then, the code waits for 'onTime', which is 1000 millseconds in our example. Next, pin 4 is turned off with the digitalWrite command. The code waits again for 'offTime', or 500 milliseconds. That block is repeated for pins 5 and 6.
To turn on two of the lights at once, you simply use two digitalWrite commands with no delay between them. Technically, the commands happen in order, but the code is so fast that you won't be able to see either light come on first. Again, you're just turning lights on, waiting, and turning them off. This project uses lots of repeated code, but you'll learn how to cut down on that in some other projects.
