
Four Note Piano with Synchronized LED
Step 1 - Build the Project
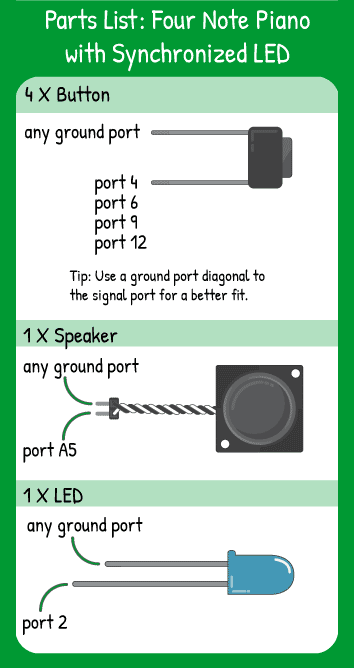
Topics Covered:
For this piece of code, you combine 4 inputs and 2 outputs. Each input will affect both outputs- each button press creates a tone and turns on a light. You’re adding together many simple parts to create a more complex and interesting project!
Step 2 - Upload the Code
Step 3 - Read the Walkthrough
First, you create two variables: led and speaker. These are replacing the pin numbers in the loop so that you can easily change the pin that the LED or speaker is on. It’s up to you when to change a pin number into a variable, but it’s a good idea to do if you’re using that pin number more than twice. Otherwise, it’s easy to miss one of the statements that uses the pin number you want to change.
Next is setting up each component. Since the variables have already been declared above the setup(), you’re free to use them for the setup section, too. The order of the setup() doesn’t matter too much, but it’s helpful to group things together that belong together.
The focus of the loop is to continually check each button using ‘if’ statements. When it finds a pressed button, the next code between the { and } will run. This code uses the if- else if- else format, which means that once a button is found to be pressed, the next else if condition is not checked. Using if-else if- else creates a priority among the checks. For example, once the code has found that digitalRead(4) is LOW, it won’t even check if digitalRead(6) is LOW because it’s a lower priority.
Using the if-if-if format, the code would run the most recent code, so pressing both 4 and 6 together would mean the 6 tone was played. This concept is important if you want to prioritize your code’s outcomes.
Within each ‘if’ loop, there are two commands side-by-side, the tone and the light. These will happen at almost the exact same time and will stay on until the code checks and finds that the ‘if’ statement is not true.
If none of the statements are true, the ‘else’ statement is the last condition. It can’t be true or false, it always runs if the code reaches it. In this case, it turns off the light and speaker. After that, the code loops back up to the top and starts over!
