LED Strip Thermometer

Code

The code in the editor below is ready to run! Plug your Code Lab in to your computer's USB port with the cable and hit 'Upload Your Code!' to see what it does. Change something in the code, like a delay or pin number. Try to add something new to the program - it's yours to tinker with! You can always press the 'Restore' button to return the code to the working example.


/*LED strip thermometer*/ #include "LEDStrip.h" //The LEDStrip.h library gives your code access to special functions exclusive to the LED Strip LEDStrip strip = LEDStrip(50, 13, 12); //Set up the strip by defining how many pixels (50) and which pins of the microchip are used (always 13 and 12 on Code Lab) void setup() { pinMode(A1,INPUT); //temperature sensor in the smaller block of ports with the + and - ports } void loop() { int tempF = analogRead(A1)*0.46; //create a variable named tempF that converts the analogRead from A1 into a temperature tempF = map(tempF,60,80,0,49); //'map' the temperature variable range from 65-80 onto the pixels 0-49 of the LED strip //Now a tempF value of 60 = 0 on the LED strip. A tempF value of 80 = 50 on the LED strip. strip.clear(); //clear the strip before you start showing the pixels on it /* Create a variable i that has a starting value of 0 and, as long as i is less than pixelCount, run the code between the curly braces, then increase the value of the 'i' variable by 1*/ for(int i = 0; i < tempF; i++){ strip.setPixel(i,200,10); //Use the variable 'i' to set which LED pixel is being lit up. 10 here is the brightness value } strip.draw(); //send the setPixel data to the LED strip delay(1000); //Wait 1000 milliseconds (1 second) between temperature readings } // (c) 2021 Let's Start Coding. License: www.letsstartcoding.com/bsdlicense
 

Walkthrough Video

Watch the video for a line-by-line explanation of how the example program works. Then you'll be ready to make some changes of your own!

Video Notes for Code Lab Users:

  • You will use “50” instead of “15” as the first argument in your LEDStrip function.

  • The second and third arguments of the LEDStrip function (13 and 12) do not need to change. These connections are permanently set on Code Lab.

  • Your “map” function has an argument of 49 instead of 14 because you have 50 LEDs on your Code Lab. The video references an LED strip with only 15 LEDs.

  • The video walks through an example using a temperature of 70. With Code Lab, this will translate to about 25 LED pixels lit, not 7. In the second example where the temperature equals 80, there will be 50 pixels lit, not 15 as the video says. In this second example, the “for” loop will run 50 times, not 15 times as the video says.

Use this spectrum to estimate the color values you'll need for your 'setPixel' arguments to achieve your favorite color!

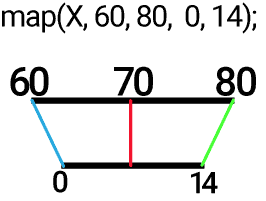
This graphic represents how some values from the turn knob will be 'mapped' onto the pixel colors of the LED strip.

Challenges

Can you complete the challenges? Change the code in your code editor above. Upload your code to see the effect when you're finished. Complete a challenge? Check it off the list!

Concepts

These are the new code concepts covered in this example program. To become a great coder, read through these concepts to learn new vocabulary.

Quiz

If you're having trouble, try to run an experimental program or look at the example code to help you find the answer.

1. Which syntax ends the entire 'void loop' function?


2. Which syntax ends a single code command?