
Blink Thermometer
Step 1 - Build the Project
Use a temperature sensor to blink out the current temperature with two LEDs. One LED blinks the 'tens place' and the other blinks the 'ones place'. All of the code is in the setup(), so the temperature will only blink out once when Maker Board is powered on.
Step 2 - Upload the Code
Step 3 - Read the Walkthrough
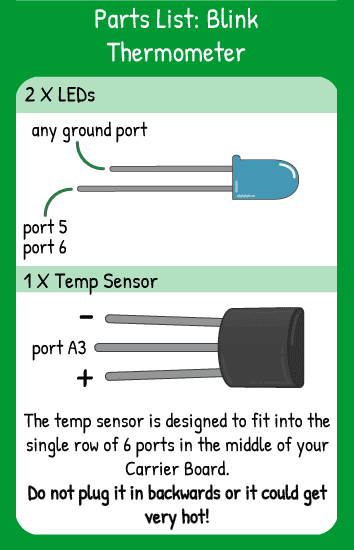
In the setup() section of the code, set the LED pins as OUTPUTs in the code so they are receiving instructions from the code, not trying to send data in to the code. Set the pinMode of your temperature sensor's center pin as an INPUT. Ensure that you have the outer legs plugged in the correct orientation to + and - or the sensor will get very hot.
The first integer variable you create is tempF and it converts the analog reading of pin A3 into a Fahrenheit value that you can use. The numbers 0.88 and 58.0 are specific to this sensor, so don't worry about those. Look at "float(tempValue)" in the middle of the declaration. That is called a cast. It means "for this one line of code only, take tempValue (an int) and use it as a float". If you don't do that, tempValue will continue to act just like an int, cutting off all decimal places in the math that you're doing.
Here's a curveball: Just to the right of the = sign next to tempF, you see the letters "int". That means you're re-casting the variable to an int. The steps are as follows: Make tempValue a temporary float. Do some decimal-math with tempValue as a float. Then, turn that result back into an int. The value of that int is your tempF variable.
Now that you've done all the crazy math to get a temperature value from and analogRead, you can separate the value of the temperature into its 'tens' place and 'ones' place. You'll do this using modulo.
You create an integer variable called tempTens for the tens place. Remember that code follows the order of operations, so look at this equation from the inside out. tempF%10 will return the remainder of tempF/10. Then, you subtract the remainder from the temperature, leaving you with a number divisible by 10. Divide that difference by 10 and you have a single number representing the 10s place.
Using 'for' loops will allow you to blink the lights corresponding to your LEDs regardless of the value of the variable. The first 'for' loop creates the integer 'i' and sets it equal to 0. As long as 'i' is less than tempTens, 'i' will increase by one and run the code inside the 'for' loop. In this case, the code in the 'for' loop turns on the LED on pin 5.
To blink the 'ones' position of the temperature, you again use a 'for' loop. Instead of all the math it took to get the 'tens' place, you just use modulo to determine how many times to blink. Think about how the modulo is working. You create a new variable 'i' and set it equal to 0. As long as 'i' is less than the remainder of tempF divided by 10, the 'for' loop continues to run. That remainder is the ones place of the temperature value.
In this version, everything is in the setup and will happen only one time when the program is run.
