
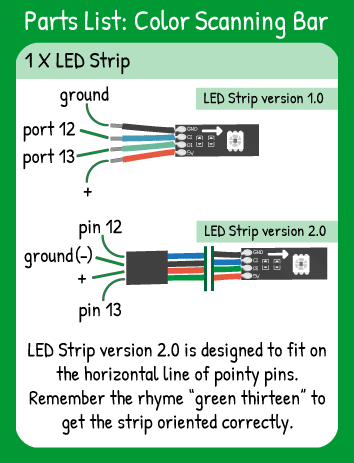
LED Strip Color Scanning Bar
Step 1 - Build the Project
Sweep a 'bar' of lights across the LED Strip.
Step 2 - Upload the Code
Step 3 - Read the Walkthrough
First include the LEDStrip library. This library gives you access to a new set of commands (called methods) that make using the LED Strip easier. Without including the library, the Arduino software won’t recognize the new methods.
Create an integer type variable named numPixels. This variable is used for your code to know where the tip of your strip is.
The color variable holds a value between 0 and 300 that corresponds to a specific color.
Create a pixel variable for the number of the pixel that is illuminated.
Finally, make the barLength variable. This is the number of pixels that is illuminated at one time as the color scrolls across the strip.
Next, create the strip object. This is communicating to the library how you have the LED strip plugged in to your carrier board and how many pixels are on it. This object is named strip, but you can change the name as long as you always address the object by its name.
The first step in the loop of the code is to wipe the strip clear with the strip.clear() command.
Next, you’ll start to ‘draw’ the bar with a for loop. In the for loop, you create a new variable called i and, as long as i is less than barLength, you run the for loop and increase i by one each time.
Inside the for loop is the .setPixel method. This method takes two arguments- which pixel to light and which color to give it. Here, you’re replacing the pixel with an equation. (pixel + i) means that pixel will stay the same throughout the for loop, but you’ll be adding larger and larger numbers to it as i grows.
The %(numPixels+barLength) portion of the pixel location means that the maximum pixel you can write to is numPixels + barLength. If your strip has 15 pixels and the barLength is 6, then you can ‘write’ to pixel 21, but you won’t see anything.
Modulo (%) is a useful tool here because it is returning the remainder of (pixel+i)/(numPixels+barLength). Imagine this: pixel is 7, i is 7, numPixels is 15, and barLength is 6.
pixel + i = 14. numPixels + barLength is 21. 14/21 is 0 with a remainder of 7. So the 7th pixel is being written to.
This seems very tricky, but it helps ensure that the strip is entirely clear of one color bar before another color bar starts.
After the for loop has completely run, the value of pixel is increased by one (++).
The if statement checks to see if pixel has reached the end of the strip. If that is true, the color value is increased by 50, then that sum is ‘modded’ by 300.
When the number is ‘modded’ (%) by 300, it takes the remainder of the division. So if the color value was 250, then adding 50 to it makes the color 300. 300/300 is 1 with a remainder of 0, so the color value is now set to 0.
The next if statement checks to see if the pixel is one ‘barLength’ off of the tip of the strip. When that statement is true, the strip is empty for a moment. That’s when the pixel value is reset to 0.
Finally, the strip.draw() command displays all of the strip.setPixel values on the LED strip. The delay affects how long it takes for a pixel movement to happen.
