
Four Note Piano
Step 1 - Build the Project
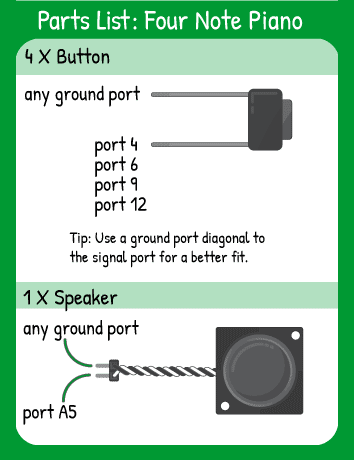
This code combines 4 button inputs to vary the output of a speaker. Each input is assigned a different output tone using if-else if statements. Once each button is set up to receive input and the speaker is set as an OUTPUT, the loop checks the status of each button until it finds one that is pulled LOW by a press. Then, it runs the code between the { and }.
Step 2 - Upload the Code
Step 3 - Read the Walkthrough
The if- else if structure allows the loop to stop checking the remaining else-if statements after any of them is proven true. For example, if digitalRead(4) == LOW, the code won’t go on to check if digitalRead(6) == LOW. This allows you to create a priority of your ‘if’ statements. If you press two buttons at once, the one higher in the else-if will run and nothing below it will run.
Here, even the ‘else’ noTone() won’t run immediately after a button is released. Instead, the code will start back from the top and check each button again and only run the noTone() function when there are no buttons pressed that time. Remember, all of this is happening so fast that it’s hard to notice any difference!
